ESP32 语音助手
ESP32S3 Box 提供了 chatgpt 的 demo。因为访问不了的原因,打算改来做一个本地化部署的专用语音助手。
前置条件:
- >=12GB显存的显卡
- ESP32S3-Box
语音助手
Roadmap:
- 更改demo中的默认界面语言,并且删除与OpenAI相关的代码实现
- 更新demo的默认语音
- 更新语音唤醒的提示词
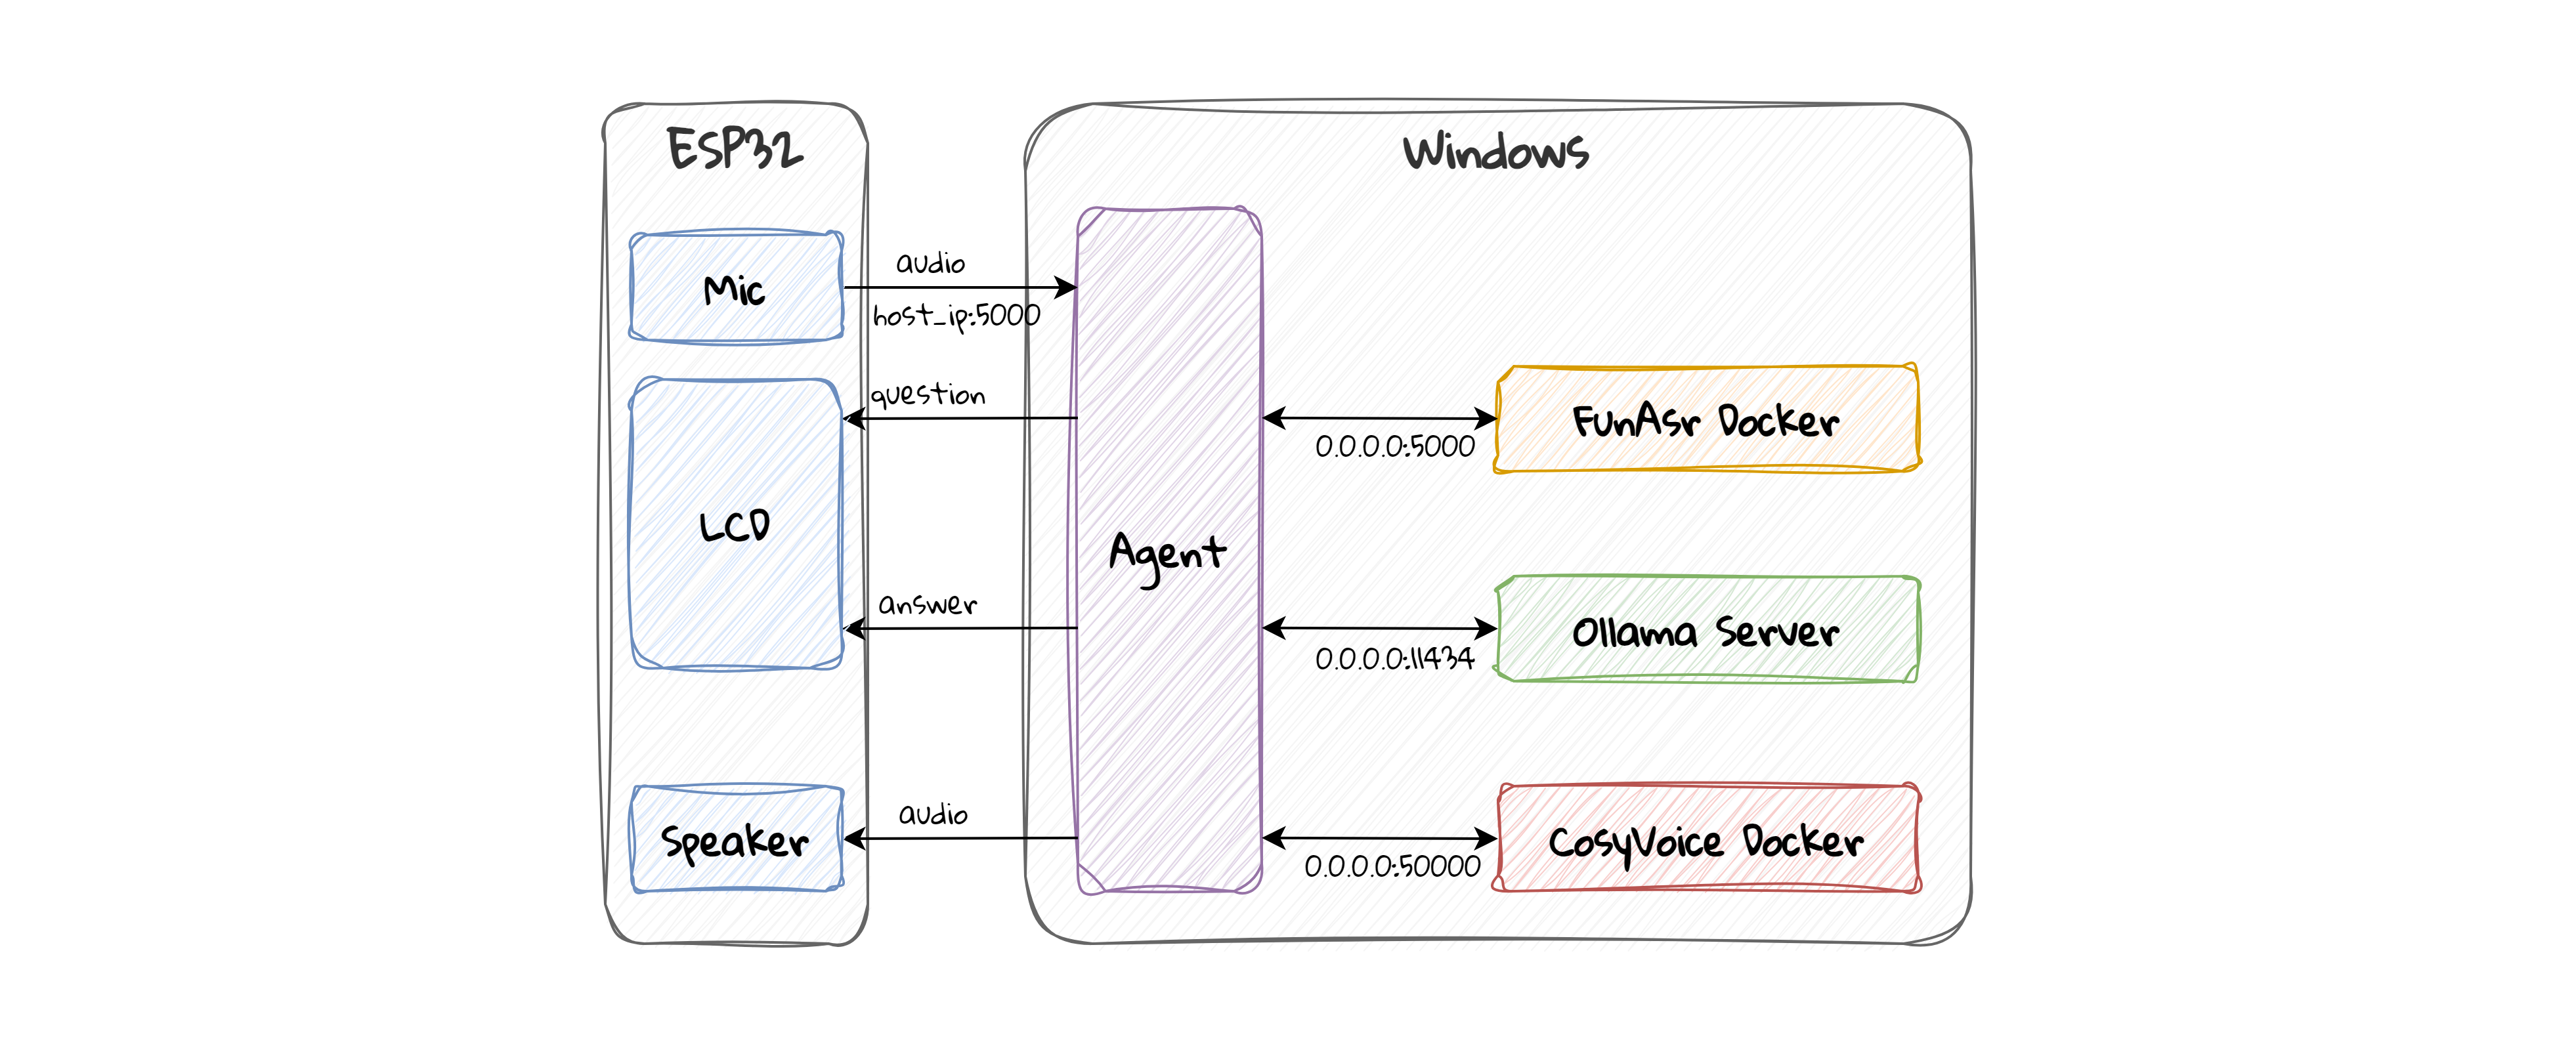
- 写一个python上位机服务器,接受ESP32的请求,处理完数据后
- 接收ESP的音频
- 下发语音识别结果,即第一串字符
- 下发ollama生成的结果,即第二串字符
- 下发语音生成的结果,即第三段数据
- ESP继续超时等待结果,收到后,播放声音
- 模型微调
- 提示词
- 语音clone
- 查看B站的开源示例,寻找降低延迟的手段
调试步骤
Windows 运行 Docker Desktop
WSL 中打开 FunASR docker,参考:准备FunASR
1
sudo bash work/funasr/funasr-runtime-deploy-online-cpu-zh.sh restartPowershell 打开Ollama server,设置支持局域网模式
1
2
3[Environment]::SetEnvironmentVariable('OLLAMA_HOST', '0.0.0.0:11434', 'Process')
[Environment]::SetEnvironmentVariable('OLLAMA_ORIGINS', '*', 'Process')
ollama serveWindows 运行cosyvoice docker,在 Docker Desktop 中直接运行。参考:Cosyvoice docker
如果是 wsl 开发的 esp,则需要管理员模式打开powershell,绑定 ESP-IDF 串口,再进行下载
1
usbipd attach --wsl --busid=1-1运行 server.py 脚本
- windows 需要下载 ffmpeg,并在环境变量中添加 bin 的路径
- 安装一些脚本需要的依赖
1
2
pip install numpy websockets requests torchaudio ollama simpleaudio python-ffmpeg soundfile ffmpeg ffmpeg-python
python server.py下载烧录,编译参考 编译 esp assistant
1
2
3
# WSL下需要使能idf环境
# get_idf
idf.py -p /dev/ttyACM0 flash monitor
遇到的问题
chatgpt demo 连接不上wifi:点击进入返回出厂设置,这时候电脑显示连上了U盘,更改文件中的 wifi 设置即可
进入工厂模式后无法烧写:按住boot键,松了按reset键,可以恢复烧写
在WSL2中,server.py 脚本无法被ESP访问端口:通过转发端口方式,实际操作总是有问题。解决方法是把 server agent 放 windows 端,带来了下面的问题。
server.py 脚本无法访问 Ollama server:把 VPN 关了。
WSL2部署的 cosyvoice server 无法访问:创建 cosyvoice fastapi docker 容器,先提前下载一个镜像
1
docker pull pytorch/pytorch:2.0.1-cuda11.7-cudnn8-runtime按照官方教程编译fasapi container。
cosyvoice fasapi container 无法外部访问:需要将cosyvoice fastapi docker的ip设为0.0.0.0,以让host能够访问,需要下载一个vim,然后更改 fastapi 路径下的 server.py 里的 ip
cosyvoice fastapi container 运行报错,显示为:CUFFT_INTERNAL_ERROR
解决:到 cosyvoice 给的 docker container里,卸载掉 11.7 的 pytorch cuda:
1
2
pip uninstall torch torchaudio
pip install torch==2.0.1 torchaudio==2.0.2 --index-url https://download.pytorch.org/whl/cu118Windows Server 保存音频,save 时无法保存音频。在wsl2的客户端保存音频没问题
1
2
raise RuntimeError(f"Couldn't find appropriate backend to handle uri {uri} and format {format}.")
RuntimeError: Couldn't find appropriate backend to handle uri tmp.wav and format None.在 save 时无法保存音频。解决,安装后端,并且不要使用windows conda,导致 pip 包混乱。
1
pip3 install ffmpeg soundfile生成的音频转码至 mp3 下载到内存中无法播放:改用 wav 写入spiffs文件系统中,再调用播放的接口。
wav 播放诡异:采样率不对,按照代码中设置的,在host端调用ffmpeg先调整一下采样率和比特率。
ESP32 只能录音一部分,后面会丢失:TODO
wav 文件下载太慢,文件IO操作次数太多,文件碎片严重:将文件压缩为 mp3,统一下载到内存后,写入文件系统,再进行播放。
详细记录
推荐使用 Windows 版本的 ESP-IDF。
Windows 安装 ESP-IDF
Windows 安装教程下载release版本的离线安装包就好了,然后进入powershell。Windows Terminal 也会创建 ESP-IDF 的页面。
编译 esp assistant
1 | |
WSL 安装 ESP-IDF
不推荐使用WSL,各种大麻烦小麻烦。
配置 IDF
在linux环境中手动安装最新版本的 ESP-IDF:
1 | |
卡住哪个压缩包下载不下来,就到网页中手动下载,然后它会创建python虚拟环境,到idf-tool.py中找到pip下载的部分,在后面加上-i https://mirrors.aliyun.com/pypi/simple/以加快速度
设置环境变量:
1 | |
使用get_idf进入python虚拟环境
编译 chatgpt demo
1 | |
这里设置一下wifi和openAI密钥等信息:

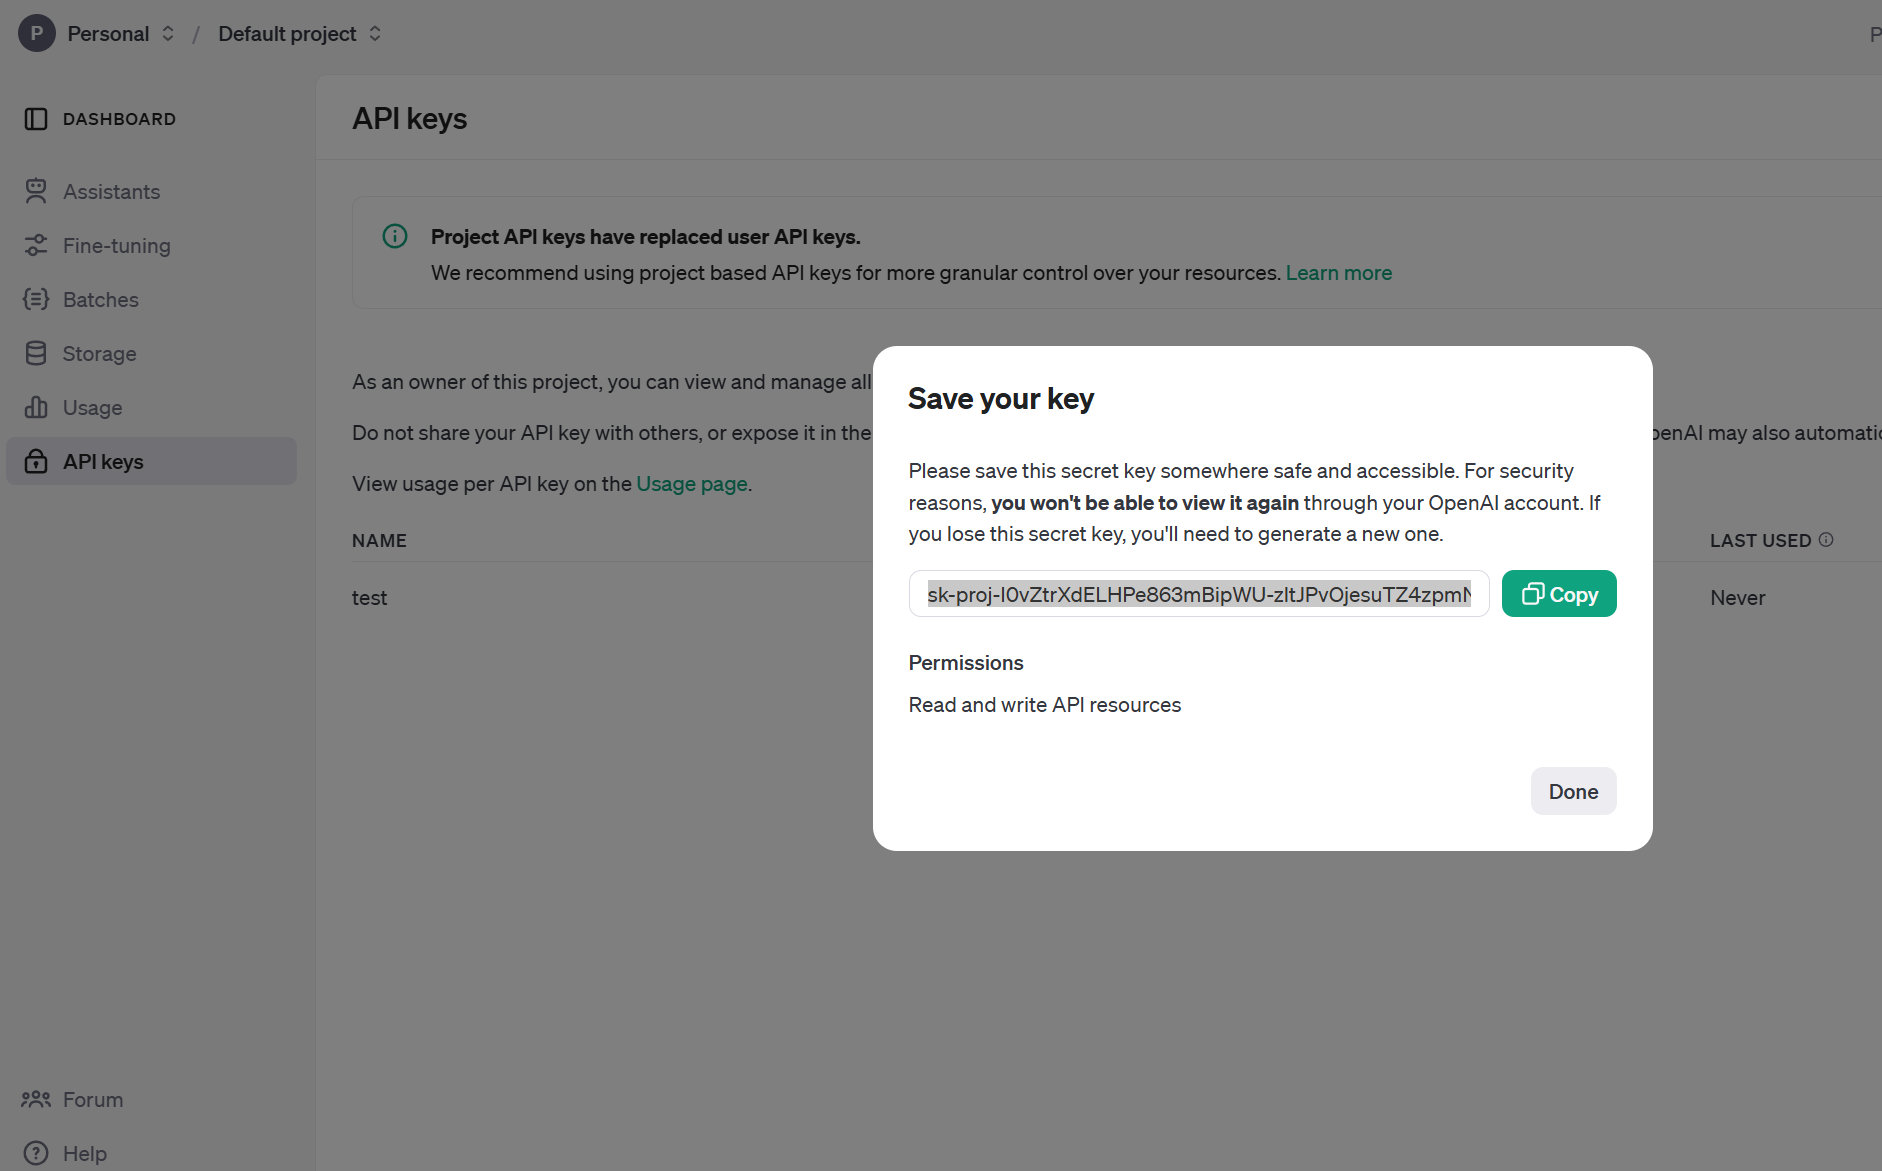
OpenAI Key:https://platform.openai.com/api-keys
这里它会手动为IDF-ESP下载submodule,时间比较长,尤其会卡在esp_wifi包,如果卡住了,ctrl-C后继续,它会跳过这个包的更新去继续下载,然后进入menuconfig,但是最后编译的时候会报错,因为找不到库
1 | |
到esp-idf/components/esp_wifi目录下,删除里面所有文件后通过git checkout 将文件还原,可以解决上述这个问题。
也有可能是网好了给我下载下来了,总之,祈祷网是好的。
完成后,开始build
1 | |
编译chatgpt-demo:
1 | |
串口映射
参考:wsl2中访问windows上的串口。windows下载安装:usbipd-win
在WSL中
1 | |
管理员模式下打开Powershell:
1 | |
WSL中,找到TTY:
1 | |
下载
1 | |
烧写不进去,按住BOOT,再按reset,等待串口烧录。找不到串口时,在powershell重复上述的操作。